If you’ve just unboxed your first fabric cutting machine, or you’re upgrading from hand scissors and wondering how to use a fabric cutting machine without ruining your materials, you’re in the right place. These tools can cut through multiple layers of fabric in seconds, saving you hours of prep time for quilting, garment sewing, or embroidery projects. But like any sewing room tool, they require proper setup and technique to get clean, accurate cuts every time.
SnapFresh Cordless Electric Scissors, 4V Electric Mini Box Cutter, Carpet & Cardboard Cutter Tool with a Replacement Blade/Charger, Rotary Cutter for Cardboard Packages Leather Plastic (Green)
Check PriceWhat Is a Fabric Cutting Machine?
A fabric cutting machine is a specialized tool designed to cut fabric faster, more accurately, and with less hand fatigue than traditional scissors. Unlike handheld shears, most cutting machines use a rolling circular blade, die-cast template, or electric motor to slice through fabric with consistent pressure. They’re staples in quilting studios, garment workrooms, and home sewing spaces for projects ranging from simple pillowcases to complex embroidery patterns.
Worx Zipsnip Cordless Electric Scissors, Rechargeable Cardboard Box Cutter, 4V Powerful Fabric Scissors with 2 Safety Blades & Storage Bag WX082L.2
Check PriceCommon Types of Fabric Cutting Machines
Not all fabric cutting machines work the same way. The most popular home options include:
- Manual Rotary Cutters: The most affordable and widely used option, these handheld tools feature a circular blade that rolls along a ruler to cut straight lines and angles. They work with a self-healing cutting mat and acrylic ruler for accuracy.
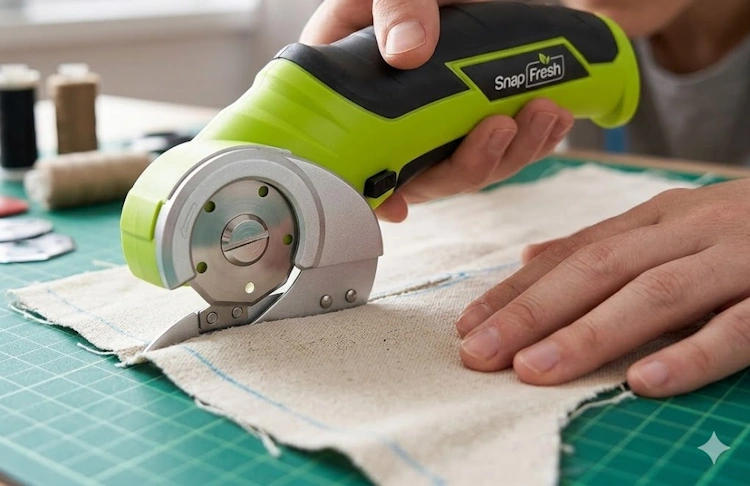
- Electric Fabric Cutters: Corded or battery-powered tools that automate the blade rolling process, reducing hand strain during long cutting sessions. They’re ideal for thick fabrics like denim, canvas, and leather.
- Die Cutting Machines: Tabletop tools that use pre-shaped metal dies to cut identical shapes (quilt squares, appliqué pieces) from fabric. Popular brands include Sizzix and Cricut for fabric-specific models.
If you’re still shopping for a tool, check out our roundup of top-rated fabric cutter machines to find an option that fits your budget and project needs.
Key Parts You Should Know
Before you start cutting, familiarize yourself with these core components of most fabric cutting machines:
- Blade: Circular or straight metal edge that does the cutting. Blades come in different sizes (18mm to 60mm for rotary cutters) and sharpness levels for different fabrics.
- Self-Healing Cutting Mat: A thick, non-slip mat with grid lines that protects your work surface and extends blade life. Never use a regular plastic or wooden cutting board with your machine.
- Acrylic Ruler: Non-slip, grid-marked rulers that guide the blade to ensure straight, accurate cuts. Look for rulers with 1/8-inch grid lines for precise measurements.
- Safety Guard: A retractable cover that slides over the blade when not in use to prevent accidents.
- Blade Lock: A switch that keeps the blade fixed in place during storage to avoid accidental cuts.

Cordless Electric Scissors, 4.2V Electric Cardboard Cutter with LED Display, 4-Speed Rechargeable Electric Box Cutter for Cardboard, Fabric, Leather & Carpet, Type-C Fast Charging
Check PricePre-Use Preparation: Set Yourself Up for Success
Rushing into cutting without prepping your space and materials is the number one cause of uneven cuts and ruined fabric. Follow these steps before you pick up your machine:
Gather Your Supplies
- Self-healing cutting mat (at least 18×24 inches for most home projects)
- Acrylic ruler (6×24 inches is the most versatile size for beginners)
- Fabric you plan to cut (pre-washed and ironed to remove wrinkles and shrinkage)
- Blade oil (for electric cutters) and a small brush for cleaning debris
- Non-slip ruler grips (optional, but helpful for preventing ruler slippage on slick fabrics)
Choose the Right Workspace
Set up your cutting station on a flat, stable surface at waist height to avoid back strain. A dedicated cutting table is ideal, but a clean kitchen counter or desk works too. Avoid cutting on soft surfaces like beds or sofas, which bend the mat and cause crooked cuts. Make sure you have enough space to lay out your full fabric length without bunching.
Select the Correct Blade
Blade size and sharpness matter more than you might think. A 45mm blade is the standard for most quilting cotton and lightweight fabrics, while a 60mm blade handles thick materials like denim, canvas, and leather. Use a fresh, sharp blade every time you start a new project: dull blades drag, snag fabric, and leave jagged edges. For delicate fabrics like silk or chiffon, use a smaller 28mm blade for better control.
Step-by-Step Guide: How to Use a Fabric Cutting Machine
Now that your space is prepped, follow these steps for clean, accurate cuts every time. These instructions apply to manual rotary cutters, the most common type of home fabric cutting machine; electric and die cut machines follow similar core principles with minor brand-specific adjustments.
Step 1: Secure Your Cutting Mat
Place your self-healing mat on your work surface, aligning the grid lines with the edge of your table for easy measurement. If your mat slides, place a non-slip shelf liner underneath it. Never cut directly on your table or counter without a mat: you will damage your surface and dull your blade in seconds.
Step 2: Prep and Layer Your Fabric
Fold your pre-washed, ironed fabric with selvages (the finished edges) together, smoothing out all wrinkles with your hands. For straight cuts, align the fabric grain (the lengthwise threads running parallel to the selvage) with the mat’s grid lines. Layer up to 4-6 layers of quilting cotton for rotary cutters, or 10+ layers for electric cutters: never overload the machine, as this causes blade drag and uneven cuts. Pin layers together loosely at the edges to prevent shifting, but avoid pinning in the path of the blade.
Step 3: Align Your Ruler
Place your acrylic ruler on top of your fabric layers, aligning the desired cut line with the ruler’s grid marks. Use the mat’s grid lines to double-check that your ruler is straight: even a 1-degree tilt will result in crooked cuts across long fabric lengths. For extra stability, add small non-slip grips to the back of your ruler, or hold it firmly in place with your non-dominant hand, keeping fingers at least 2 inches away from the blade path.
For more guidance on avoiding wavy edges and uneven lines, read our guide to cutting fabric straight every time.
Step 4: Make the Cut
For manual rotary cutters: retract the safety guard, place the blade at the start of your cut line, and apply even downward pressure as you roll the blade smoothly from one end of the ruler to the other. Do not stop mid-cut, as this leaves a notch in the fabric edge. Keep the blade flush against the ruler’s edge the entire time: the blade should never drift away from the guide.
For electric cutters: Turn on the machine, guide the blade slowly along the ruler’s edge, and let the motor do the work. Do not force the machine: if it drags, you’ve overloaded the fabric layers or your blade is dull.
For die cut machines: Load your chosen die (shape) into the machine, place your fabric on top of the die, and run the sandwich through the machine’s rollers according to the manufacturer’s instructions.
Step 5: Check and Clean Up
After cutting, lift the fabric layers and check that all cuts are clean and straight. Trim any small frayed edges with scissors. Retract the blade guard immediately, and brush off any fabric lint from the blade and mat. Store your machine in a dry place, with the blade locked in place, away from children and pets.
Fabric-Specific Cutting Tips
Different fabrics require small adjustments to your cutting technique to avoid damage. Here are tips for common materials:
- Delicate fabrics (silk, chiffon, lace): Cut single layers only, use a sharp 28mm blade, and place a piece of tissue paper under the fabric to prevent stretching. Avoid pulling the fabric as you cut.
- Stretchy fabrics (spandex, jersey knit): Use a rotary cutter with a serrated blade to grip the fabric and prevent stretching. Layer no more than 2-3 layers at a time.
- Heavy fabrics (denim, canvas, leather): Use a 60mm blade or electric cutter, and cut no more than 2-4 layers at a time. Replace your blade more frequently, as thick fabrics dull blades faster.
- Quilting cotton: The most forgiving fabric for beginners: cut up to 6 layers with a 45mm blade, and use the mat’s grid lines to cut precise squares and strips.
As noted in university-backed fabric cutting guides, pre-washing all fabric before cutting is critical to avoid shrinkage that warps your finished project.
Common Issues and How to Fix Them
Jagged or Uneven Cuts
Usually caused by dull blades, uneven pressure, or a slipping ruler. Replace your blade, hold the ruler firmly, and practice on scrap fabric first.
Fabric Slipping During Cuts
Use extra pins to secure layers, add non-slip ruler grips, or place shelf liner under your fabric. Avoid cutting on slick surfaces without a mat.
Blade Dragging or Stalling
You’ve overloaded fabric layers or have a dull blade. Remove excess layers, replace the blade, or oil electric cutter blades as instructed.
Frequently Asked Questions
Can I cut multiple layers of fabric at once?
Yes, most machines cut multiple layers. Rotary cutters handle 4-6 layers of quilting cotton, electric cutters manage 10+ lightweight layers. Check your manual for max limits.
How often should I replace my cutting machine blade?
Replace after 10-15 hours of use, or sooner if you notice snagging or jagged cuts. Thick fabrics dull blades faster than cotton.
Is a fabric cutting machine worth it for beginners?
Yes. Even a basic $20 rotary cutter saves time and improves accuracy over hand scissors, and reduces hand fatigue for new sewists.
Can I cut curves with a fabric cutting machine?
Yes, use a smaller 18mm or 28mm blade for control. For intricate shapes, die cut machines with pre-shaped dies work best.
How do I clean my fabric cutting machine?
Unplug electric models first, brush off lint with a stiff brush, wipe the blade dry, and oil moving parts every 20 hours of use. Never submerge in water.
Conclusion
Learning how to use a fabric cutting machine is one of the best investments you can make in your sewing journey. With proper setup, the right blade, and a little practice, you’ll cut prep time in half and get professional-quality results on every project. Start with scrap fabric to practice your technique, always prioritize safety by retracting the blade guard when not in use, and don’t be afraid to experiment with different fabrics and layer counts to find what works best for your machine. Whether you’re quilting, sewing garments, or making home decor, a fabric cutting machine will quickly become your most-used sewing room tool.