Nothing ruins a sewing project faster than uneven fabric edges, puckered hems, or pattern pieces that refuse to line up. You might spend hours sewing a custom dress, only to find the hem dips on one side, or a quilt block that’s 1/4 inch too small to fit with the others.
If you’ve ever stared at a jagged fabric edge, kicked yourself for wasting expensive yardage, or ripped out seams because pieces didn’t match, learning how to cut fabric straight is the single most impactful skill you can master to improve your finished results.
Whether you’re working on a simple pillowcase, a pair of heavy denim jeans, or a delicate silk camisole, straight cuts form the foundation of every successful sew. In my 12 years of sewing professionally and as a hobbyist, I’ve tested every cutting method under the sun, and these foolproof steps will work for every skill level.

SnapFresh Cordless Electric Scissors, 4V Electric Mini Box Cutter, Carpet & Cardboard Cutter Tool with a Replacement Blade/Charger, Rotary Cutter for Cardboard Packages Leather Plastic (Green)
Check PriceWhy Cutting Fabric Straight Matters for Every Sewing Project
You might wonder if a slightly crooked cut really matters, especially if you’re hemming a project anyway. The truth is, even a 1/8 inch deviation per cut adds up quickly. For a 4-piece quilt block, that’s a 1/2 inch discrepancy by the time you assemble the block. For a garment with 4 pattern pieces per side, that’s a full inch of mismatch by the time you sew the front and back together.
Straight cuts also protect the integrity of your fabric’s grain line. The lengthwise grain (parallel to the selvage, the finished edge of the fabric) has almost no stretch, while the crosswise grain (perpendicular to the selvage) has slight stretch, and the bias (diagonal) has maximum stretch. Cutting straight along the grain ensures your finished project hangs correctly, doesn’t twist after washing, and fits as intended. Cut off-grain, and you might end up with a t-shirt that twists around your torso, or curtains that sag in the middle.
Proper straight cuts also reduce fabric waste. Crooked cuts often mean you have to trim away excess material, or worse, scrap an entire piece and cut a new one, which adds up fast when working with expensive specialty fabrics like silk or wool.
Essential Tools for Straight Fabric Cuts
Pink Power Cordless Electric Scissors Fabric Cutter for Crafts, Box, Sewing, Carpet, & Scrapbooking – Heavy Duty Professional Rotary Shears Cutting Tool – Automatic Cardboard Cutter Fabric Scissor
Check PriceCutting Tools
You don’t need a studio full of expensive gear to cut fabric straight, but a few key tools make the process infinitely easier. We cover all scissor-based methods in our guide to cutting fabric with scissors, and our scissor-free cutting tutorial breaks down rotary and electric cutter options.
First, fabric scissors: never use your fabric shears for paper, as this dulls the blade quickly. Look for bent-handled shears that let you keep the fabric flat on the table while cutting. Rotary cutters are the gold standard for long straight cuts: these circular blade tools come in 18mm, 28mm, 45mm, and 60mm sizes, with 45mm being the most versatile for general sewing. Always use a rotary cutter with a self-healing cutting mat to protect your table and keep the blade sharp.
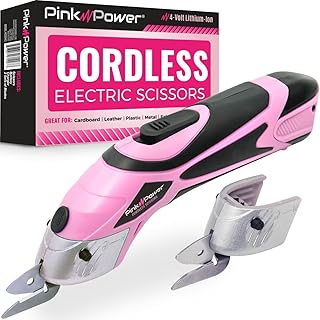
Electric fabric cutters are ideal for thick fabrics like denim, canvas, or leather, and reduce hand fatigue for large projects. For more on selecting the right cutting tools for your skill level, refer to The Spruce Crafts’ expert fabric cutting guide, a high-authority resource trusted by sewers worldwide.
Measuring and Marking Tools
Even the sharpest scissors won’t help if you don’t mark your cut line correctly. You’ll need:
- Clear acrylic ruler: Look for a 6×24 inch ruler with 1/8 inch grid lines for maximum precision.
- Self-healing cutting mat: Get a mat at least 18×24 inches to accommodate most fabric widths.
- Fabric marker or chalk: Use water-soluble markers for light fabrics, tailor’s chalk for dark fabrics.
- Pattern weights: These replace pins to hold fabric flat without distorting the grain.
- Sewing clips or pins: Use glass-head pins or clips to secure multiple layers of fabric.
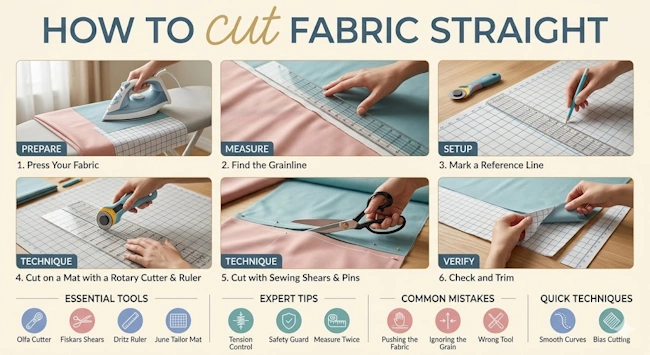
Step-by-Step Guide to Cutting Fabric Straight
Prepare Your Fabric First
Never skip fabric prep, or you’ll end up with cuts that are straight initially, but warp after the first wash. Follow these prep steps every time:
- Prewash and dry your fabric exactly as you will the finished project. This accounts for shrinkage before you cut.
- Press your fabric with an iron to remove all wrinkles. Wrinkles distort the grain line and lead to crooked cuts.
- Lay fabric on a large, flat, hard surface. A dining table or dedicated cutting table works best; avoid cutting on soft beds or couches, which let fabric sink and distort.
- Align the selvage edges (the finished, non-fraying edges of the fabric) together. The fabric should lie flat with no puckers. If the selvages pull the fabric into a tube, clip the selvage every few inches to release tension.
- Check the grain line: use a ruler to measure from the selvage to your cut line at both ends of the fabric. If the measurements match, your cut line is parallel to the grain.
Method 1: Cutting Straight with Fabric Scissors
LIVINGO Premium Tailor Scissors
Check PriceThis is the most accessible method for beginners, as most people already own fabric scissors. Follow these steps:
- Use your clear acrylic ruler and fabric marker to draw your cut line along the grain, checking measurements at both ends of the fabric.
- Secure the fabric with pins every 3-4 inches along the cut line, or use pattern weights to hold it flat.
- Place your scissors on the fabric, keeping the blade flat against the table. Cut in one long, smooth stroke, rather than short choppy cuts. Never lift the fabric off the table while cutting.
- For thick fabrics, cut through one layer at a time, or use heavy-duty shears to cut through 2-3 layers max.
For more detailed scissor techniques, refer back to our fabric scissor cutting guide.
Method 2: Using a Rotary Cutter and Ruler
SnapFresh Cordless Electric Scissors, 4V Electric Mini Box Cutter, Carpet & Cardboard Cutter Tool with a Replacement Blade/Charger, Rotary Cutter for Cardboard Packages Leather Plastic (Green)
Check PriceRotary cutters are the gold standard for straight cuts, especially for quilting, home decor, and cutting multiple layers at once. Steps:
- Place your self-healing mat under the fabric, with the acrylic ruler along your marked cut line.
- Hold the ruler firmly with your non-dominant hand, keeping your fingers tucked away from the edge to avoid cuts.
- Run the rotary cutter along the edge of the ruler, applying even pressure. The blade should cut through the fabric in one pass; if it doesn’t, the blade is dull and needs replacing.
- For multiple layers, stack fabric neatly, align selvages, and cut through all layers at once with a 60mm rotary cutter.
This method is covered in depth in our scissor-free cutting guide.
Method 3: Cutting Straight Without Special Tools
If you don’t have a rotary cutter or acrylic ruler, you can still cut straight with household items:
- Use a hardcover book or sturdy piece of cardboard as a straight edge to mark your cut line.
- Fold your fabric in half along the selvage, so the cut line is doubled. This ensures both sides are identical.
- Use a piece of tailor’s chalk to mark along the straight edge, then cut with sharp scissors in long strokes.
Common Mistakes to Avoid
Even experienced sewers make these cutting mistakes sometimes. Avoid them to save time and fabric:
- Cutting on uneven surfaces: Soft surfaces like beds or carpets let fabric distort, leading to crooked cuts.
- Using dull scissors: Dull blades tug fabric, creating jagged edges and distorting the grain.
- Not prewashing fabric: Unwashed fabric shrinks after cutting, making straight edges warp.
- Lifting fabric while cutting: This pulls the grain line out of alignment, even if your cut line was marked straight.
- Skipping grain line checks: A cut line that looks straight to the eye may be off-grain by 1/4 inch over 2 yards of fabric.
Pro Tips for Perfect Straight Cuts Every Time
These tested tips will take your cutting from good to professional-grade:
- Always do a test cut on scrap fabric first to check that your measurements are correct.
- Use pattern weights instead of pins for delicate fabrics like silk, which can snag or distort with pins.
- Replace rotary cutter blades every 3-4 projects, or when you notice the blade dragging.
- Mark cut lines on both the right and wrong side of thick fabrics, to ensure you’re cutting straight through all layers.
- Cut in a well-lit area, or use a lightbox for dark fabrics that are hard to mark.
FAQ Section
Frequently Asked Questions
Can I cut fabric straight without a rotary cutter? Absolutely. Fabric scissors paired with an acrylic ruler work perfectly for straight cuts, even for beginners. Rotary cutters are faster for large projects, but not required.
Why does my fabric always cut jagged? Jagged cuts are almost always caused by dull scissors, short choppy cutting strokes, or lifting the fabric off the table while cutting. Sharpen your scissors, cut in long smooth strokes, and keep fabric flat on the table.
Do I need to prewash fabric before cutting? Yes, every time. Most fabrics shrink 2-5% in the wash, which can turn a straight cut into a wavy edge after the first wash. Prewash and dry fabric exactly as you will the finished project.
How do I cut slippery fabrics like silk straight? Use pattern weights instead of pins to avoid distorting the fabric, layer the silk with tissue paper to keep it stable, and use a sharp rotary cutter for clean edges.
Can I cut multiple layers of fabric straight at once? Yes, use a 60mm rotary cutter and acrylic ruler, or heavy-duty fabric scissors. Secure all layers with pattern weights or pins, and check that selvages are aligned before cutting.
Conclusion
Mastering how to cut fabric straight is a foundational skill that will improve every sewing project you make, from simple scrunchies to custom wedding gowns. Start by practicing on scrap cotton fabric, invest in a basic clear acrylic ruler and sharp fabric scissors, and always prep your fabric before cutting.
Remember: slow and steady wins when cutting fabric. Rushing leads to mistakes, while taking an extra 2 minutes to check your grain line and cut line can save you hours of ripping out seams and wasting expensive fabric. Try the rotary cutter method for large projects, and stick to scissors for small, delicate pieces.
With these methods, you’ll never have to deal with crooked hems or mismatched pattern pieces again. Happy sewing!