If you’ve ever admired a crisp embroidered logo on a work uniform, a whimsical character design on a kid’s t-shirt, or a delicate floral pattern on a table runner, you may have asked: how does embroidery machines work? These specialized tools have revolutionized textile decoration, turning hours of hand-stitching into minutes of automated precision. Unlike standard sewing machines, which are designed for constructing garments, embroidery machines are built solely to add decorative stitching to fabric.
Whether you’re a hobbyist curious about upgrading your craft setup or a small business owner exploring custom merch options, understanding the inner workings of these machines will help you make smarter purchasing decisions and avoid common beginner mistakes. For a full comparison of how these devices differ from standard models, check out our guide to the key differences between standard sewing machines and dedicated embroidery models.
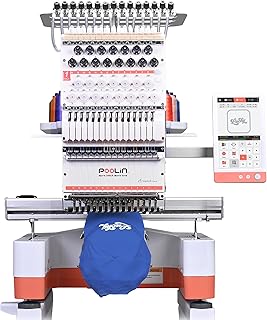
Poolin EOM 15-Needle Commercial Embroidery Machine
Check PriceWhat Is an Embroidery Machine?
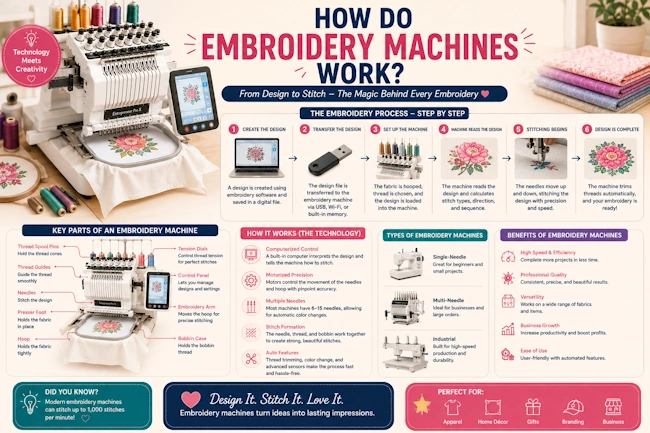
An embroidery machine is a specialized textile device that uses computerized controls (or, in rare vintage cases, mechanical templates) to stitch pre-programmed designs onto fabric. Most modern home and commercial embroidery machines are computerized: they read digital design files, then move the fabric and needle in precise sequences to replicate the design perfectly every time. This consistency is their biggest advantage over hand embroidery, which can vary in tension and stitch placement even when done by an experienced stitcher.
Key Components of an Embroidery Machine
- Needle and thread system: Embroidery machines use specialized embroidery needles (thicker than standard sewing needles) and polyester or rayon embroidery thread, which is stronger and has a shinier finish than all-purpose sewing thread.
- Hoop system: A set of two concentric rings that clamp fabric tight to prevent shifting during stitching. Hoops come in dozens of sizes, from small 4×4 inch hoops for pocket designs to large 10×16 inch hoops for jacket backs.
- Pantograph: A mechanical frame that moves the hoop in the X (left-right) and Y (up-down) axes under the needle. This is the core component that allows the machine to stitch complex shapes instead of just straight lines.
- Bobbin and hook system: Like standard sewing machines, embroidery machines use a lower bobbin thread to form stitches with the top needle thread. Most use pre-wound bobbin thread that’s thinner than standard bobbin thread to reduce bulk on the back of designs.
- Computer interface: Modern machines have LCD touchscreens or physical button controls to upload designs, adjust sizing, rotate patterns, and change thread colors.
Vintage mechanical embroidery machines skip the computer interface, instead using plastic or metal templates (called cams) that dictate stitch patterns. These are far less common today, as they can only stitch pre-loaded designs and offer no customization options.
How Does Embroidery Machines Work? Step-by-Step
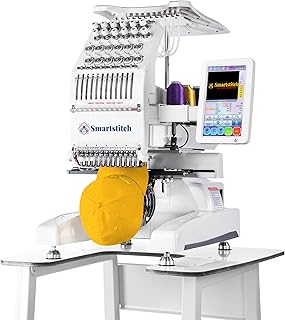
Smartstitch S-1201 Compact Embroidery Machine
Check PriceThe process of embroidery machine operation follows a consistent sequence, whether you’re using a $200 home starter model or a $20,000 commercial multi-head machine. Below is the step-by-step process for a standard computerized embroidery machine:
1. Design Preparation and Upload
First, you need a digital embroidery design file. These files have extensions like .pes (Brother), .jef (Janome), or .dst (Tajima, used for commercial machines). You can purchase pre-made designs online, download free patterns from embroidery communities, or create your own using digitizing software (programs that convert image files like JPEGs or PNGs into stitch-ready embroidery files). Once you have your file, you upload it to the machine via USB drive, Wi-Fi, or direct computer connection.
2. Fabric Hooping
Next, you secure your fabric in the embroidery hoop. Start by loosening the outer hoop, placing the inner hoop on a flat surface, laying your fabric on top, then pressing the outer hoop down over it. Tug the fabric gently from all sides to make sure it’s taut, with no wrinkles or slack. Loose fabric will shift during stitching, leading to misaligned designs or puckered fabric. For delicate fabrics like silk or chiffon, you’ll want to add a stabilizer (a temporary backing that adds structure) to prevent tearing.
3. Machine Setup and Threading
Thread the machine with your top embroidery thread, following the same path as a standard sewing machine but making sure to use the correct tension settings for embroidery (usually slightly looser than sewing tension). Load the pre-wound bobbin thread into the bobbin case, then attach your hooped fabric to the machine’s pantograph frame. Use the machine’s interface to center the design over your fabric: most machines have a trace function that moves the hoop along the outline of the design so you can confirm placement before stitching starts.
4. The Stitching Process
Once you press start, the machine takes over completely. The pantograph moves the hoop in tiny increments under the needle, which moves up and down to form stitches. The machine follows the digital design file to the exact stitch: it will stop automatically when it’s time to change thread colors, alerting you with a beep. You simply clip the old thread, load the new color, and press start again. Most designs stitch in layers: outline stitches first, then fill stitches, then top detail stitches, to ensure clean edges and even coverage.
For a deeper dive into the mechanical details of this process, refer to this trusted guide to embroidery machine functionality from The Spruce Crafts, a leading authority on home crafts.
5. Finishing and Cleanup
When the design is complete, the machine will beep to alert you. Remove the hoop from the frame, unclamp the fabric, and trim any loose thread tails on the front and back of the design. If you used stabilizer, tear it away gently (for tear-away stabilizer) or wash it out (for water-soluble stabilizer) depending on the type you chose. Press the design with a low-heat iron to remove any hoop marks, and your embroidered item is ready to use.
Computerized vs. Mechanical Embroidery Machines
As mentioned earlier, nearly all modern embroidery machines are computerized, but a small number of vintage mechanical models are still in use. Here’s how the two compare:
- Computerized machines: Read digital design files, allow custom sizing/rotation, support thousands of designs, often have color touchscreens, and automatically stop for thread changes. They range from $150 home models to $50,000+ commercial systems.
- Mechanical machines: Use physical cams (templates) to dictate stitch patterns, can only stitch pre-loaded designs, require manual adjustment for placement, and have no digital customization options. They are largely obsolete for modern use, though some crafters collect them for vintage appeal.
Common Embroidery Machine Mistakes to Avoid
Even once you understand how embroidery machines work, beginners often run into avoidable issues. Here are the most common mistakes we see in our testing:
- Skipping stabilizer: Even sturdy fabrics like denim need stabilizer to prevent puckering. For stretchy fabrics like spandex, use a cut-away stabilizer that stays permanently on the back of the design for extra support.
- Using sewing thread instead of embroidery thread: Sewing thread is thinner and has less elasticity than embroidery thread, leading to frequent breaks and dull-looking designs.
- Loose hooping: Even a small amount of fabric slack will cause designs to shift mid-stitch, ruining alignment. Always double-check tautness before starting the machine.
- Ignoring tension settings: Embroidery tension is different from sewing tension. If you see bobbin thread pulling through to the front of your design, tighten the top tension slightly.
Are Embroidery Machines Hard to Use?
One of the most common questions we get from new crafters is whether embroidery machines are difficult to operate. The short answer: no, most modern home models are designed with beginners in mind, with intuitive interfaces and automatic features that handle most of the complex work. However, there is a learning curve when it comes to digitizing your own designs, choosing the right stabilizer, and troubleshooting tension issues. For a full breakdown of the learning curve, read our guide on whether embroidery machines are difficult for beginners to operate.
Frequently Asked Questions
Can I use a regular sewing machine for embroidery?
Most standard sewing machines cannot do automated embroidery, as they lack the pantograph system to move fabric in multiple directions. However, some high-end sewing machines have a built-in embroidery mode, and you can use a free-motion embroidery foot to do manual embroidery on a standard machine (though this requires significant skill and produces less consistent results than a dedicated embroidery machine).
Do embroidery machines work on all fabrics?
Embroidery machines can stitch on almost any fabric, but delicate fabrics like chiffon, silk, and lace require extra stabilizer to prevent tearing, while thick fabrics like canvas or denim may need a heavy-duty needle and slower stitching speeds. Avoid stitching on waterproof fabrics like nylon raincoats, as the needle can punch holes that lead to leaks.
How long does an embroidery design take to stitch?
Stitch time depends on the size and complexity of the design: a small 2-inch logo may take 5-10 minutes, while a large full-back jacket design with multiple colors can take 1-2 hours. Commercial machines with multiple needles can stitch faster, as they don’t need to stop for thread changes.
Can I create my own designs for embroidery machines?
Yes! You can use digitizing software to convert any image into a stitch-ready file. Free options like InkStitch work with Inkscape, while paid options like Wilcom or Embrilliance offer more advanced features for commercial use. Beginners may find digitizing challenging at first, but there are hundreds of free tutorials available online to help you learn.
Conclusion
Understanding how do embroidery machines work takes the mystery out of this popular craft tool. To recap: these machines use computerized controls and a moving pantograph frame to stitch digital designs onto hooped, stabilized fabric, with minimal hands-on work required once the setup is complete. For beginners, we recommend starting with a budget-friendly home model with a 4×4 or 5×7 inch hoop, practicing on scrap fabric, and referencing our guides to embroidery machine differences and beginner ease of use to find the right fit for your needs. With a little practice, you’ll be creating professional-looking embroidered items in no time.