Threading a sewing machine needle by hand can often feel slow and frustrating, especially when working with tiny needle eyes or fine threads. Many sewists struggle with this step, which can interrupt the flow of a project and make sewing less enjoyable.
An automatic needle threader solves this problem by simplifying the entire process. Found in many modern sewing machines, this built-in feature allows you to thread the needle quickly and with very little effort.
How to Use an Automatic Needle Threader is something every sewist should learn, as it can save time and reduce strain. Instead of guiding the thread manually, the mechanism uses a small hook to pull the thread through the needle eye. This improves accuracy, speeds up setup, and makes sewing much easier, especially for beginners, while still offering convenience for experienced users.
LIUHG 96Pcs Professional Sewing Thread Kit, 48 Colors 400 Yards/Spool
Check PriceUnderstanding How an Automatic Needle Threader Works
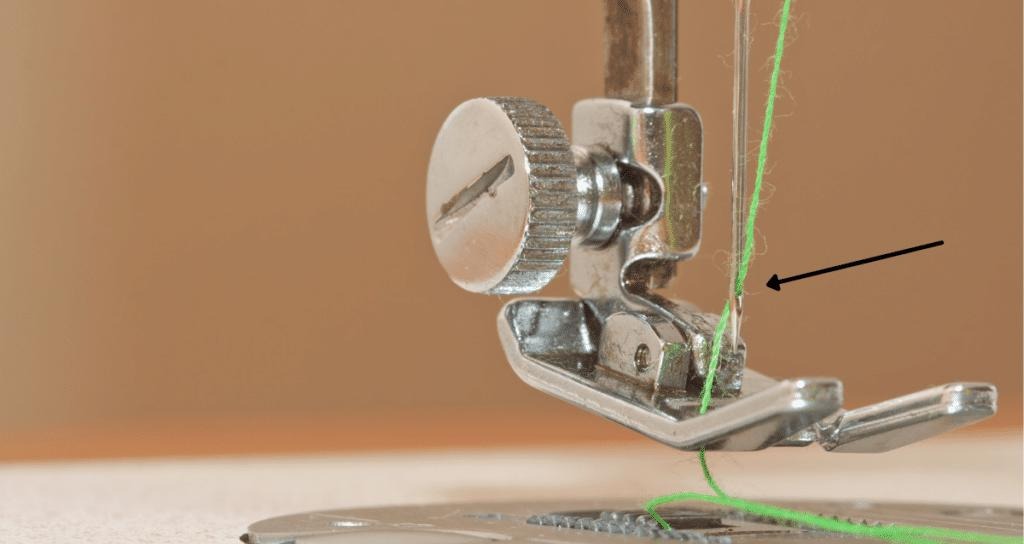
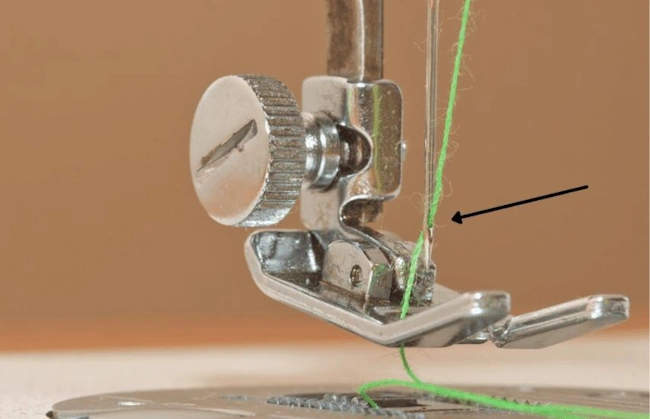
An automatic needle threader is a small mechanism built into your sewing machine near the needle area. It typically includes a lever, a tiny hook, and a guiding system for the thread.
When you pull down the threader lever, a small hook passes through the eye of the needle. You then place the thread in front of the hook. Once you release the lever, the hook pulls the thread through the needle, creating a loop that you can easily grab.
This process eliminates the need for precise hand-eye coordination, making threading quick and effortless.
What You Need Before You Start
Before using the automatic needle threader, make sure your sewing machine is properly prepared. This will ensure smooth operation and prevent damage.
- A sewing machine with a built-in threader
- A correctly installed needle (not bent or dull)
- The thread spool is placed properly
- Presser foot lowered or raised, depending on machine type
- Good lighting for visibility
Having everything set up correctly will make the threading process faster and more reliable.
Step-by-Step: How to Use an Automatic Needle Threader
Gutermann Thread Set: Sew-All: 100m: Pack of 20, Assorted
Check PriceFollow these steps carefully to thread your needle without any hassle:
Raise the Needle to the Highest Position
Use the handwheel to bring the needle to its highest point. This is essential because the threader only works when the needle is properly aligned.
Lower the Threader Lever
Gently pull down the automatic threader lever. You will see a small hook move toward the needle eye.
Position the Thread Correctly
Place the thread under the guide and in front of the hook. Make sure it sits properly in the designated slot.
Let the Hook Catch the Thread
As the hook passes through the needle eye, it will catch the thread.
Release the Lever Slowly
Carefully release the lever. The hook will pull the thread through the needle and form a small loop.
Pull the Thread Through
Use your fingers or tweezers to pull the loop completely through the needle. Your machine is now threaded and ready to sew.
Machine Settings That Help the Threader Work Properly
Simthread 63 Colors Polyester Compatible with Brother Embroidery Machine Thread Kit 40 Weight Compatible with Brother Babylock Janome Singer Pfaff Husqvarna Bernina Embroidery Sewing Machines 550Y
Check PriceTo get the best results, certain machine settings and positions are important.
- Always keep the needle at the highest position
- Ensure the presser foot is in the correct position (usually down for proper tension)
- Use standard thread tension settings
- Make sure the needle is inserted correctly
Incorrect settings can prevent the threader from working or even damage the mechanism.
Practical Tips for Smooth Threading Every Time
Using an automatic needle threader becomes easier with a few simple habits:
- Use high-quality thread to avoid fraying
- Cut the thread end cleanly before threading
- Hold the thread lightly while operating the lever
- Move slowly and avoid rushing the process
- Practice a few times on an idle machine
These tips will improve your accuracy and extend the life of the threader.
Common Problems and How to Fix Them
Even though automatic threaders are convenient, they can sometimes cause issues if not used properly.
- Thread not catching: Check if the needle is fully raised
- Hook missing the eye: Needle may be inserted incorrectly
- Thread breaking: Thread quality may be poor or tension too tight
- Threader not moving: Mechanism may need cleaning or gentle handling
Most issues can be solved by checking alignment and setup.
Best Situations to Use an Automatic Needle Threader
This feature is especially helpful in many sewing scenarios:
- Frequent needle threading during projects
- Working with fine or delicate threads
- Sewing in low-light conditions
- For beginners learning machine setup
- For users with vision or hand coordination difficulties
It saves time and makes sewing more comfortable.
Benefits of Using an Automatic Needle Threader
There are several advantages that make this feature worth using:
- Speeds up the threading process
- Reduces frustration and eye strain
- Improves accuracy
- Ideal for beginners and professionals
- Makes sewing more efficient
It’s one of the most helpful features in modern sewing machines.
Limitations You Should Know
Despite its usefulness, there are a few limitations:
- May not work with very small or specialty needles
- Requires proper alignment to function
- Can be delicate if handled roughly
- Not available on all machines
Understanding these limitations helps you use it properly.
Quick Troubleshooting Questions
Why is my automatic needle threader not working?
It usually happens due to incorrect needle position or improper threading setup.
Can I use it with all needle sizes?
No, very small needles may not be compatible with the hook.
Does it work with thick thread?
It works best with standard thread; thick thread may be harder to catch.
Is it easy for beginners?
Yes, once you learn the steps, it becomes very simple to use.
Final Thoughts
Learning how to use an automatic needle threader can make a big difference in your sewing experience. It saves time, reduces frustration, and helps you avoid eye strain, especially when working with small needles or fine threads. Whether you’re a beginner or an experienced sewist, this simple feature allows you to start your projects faster and with more confidence. By using it correctly, you can enjoy smoother, more efficient sewing every time.