Sewing leather can feel intimidating for beginners, especially when your stitches look uneven, skip, or leave permanent puckers in your material. If you’ve ever struggled with inconsistent seams on leather goods, learning how to adjust tension for sewing leather is the single most important skill you’ll master to get clean, professional results. Unlike lightweight fabrics like chiffon or silk, leather is thick, non-woven, and unforgiving of tension errors, so getting this setting right makes or breaks your project. Whether you’re making a simple leather wallet, a durable belt, or upholstery repairs, proper tension ensures your seams hold up to daily wear without damaging your material.
Brother ST371HD Sewing Machine, Strong & Tough, 37 Built-in Stitches, Free Arm Option, 6 Included Feet
Check PriceUnderstanding Sewing Machine Tension Before Adjusting for Leather
Before tweaking settings for leather, you need a basic grasp of how sewing machine tension works. Most modern machines have two core tension components: upper tension (controlled by a dial on the front of your machine, usually numbered 1-5 or 1-10) and bobbin tension (set by a small screw on your bobbin case). These two work together to pull thread from the top and bottom evenly, creating a balanced stitch where the top and bottom threads meet in the middle of your fabric.
If you’re unfamiliar with how upper and lower tension work together, read our sewing machine tension fundamentals guide first to avoid confusion. For a more technical breakdown of tension mechanisms, check out this expert-backed sewing machine tension guide from a trusted crafting resource. A common mistake beginners make is only adjusting upper tension when issues arise, but leather often requires small tweaks to both upper and bobbin tension for perfect results.

SINGER® Heavy Duty 4452 (Grey) High Speed Sewing Machine + Accessories | 32 Built-In Stitches Deliver 110 Stitch Applications | 50% More Power for Thick Fabrics, 1100 Stitches/Min, 1-Step Buttonhole
Check PriceWhy Leather Requires Unique Tension Settings
Leather is not like woven cotton, denim, or canvas. It is a dense, non-woven material with no stretch, and every stitch hole is permanent. This means tension errors that would leave minor puckers in cotton will ruin a leather project entirely. Most standard tension settings (usually 4 on a 1-5 dial) are calibrated for medium-weight woven fabrics, which are far thinner and more flexible than leather.
When sewing leather, upper tension that is too tight will pull the material into small puckers around each stitch, warp the shape of your project, or even snap your thread and needle. Tension that is too loose leaves visible loops on the back of your leather, skipped stitches, and weak seams that will fall apart with minimal use. Thicker leather (like 8-10oz veg tan) requires even lower tension than thin garment leather (2-3oz chrome tan), so there is no one-size-fits-all setting for all leather projects.
If you’re new to working with animal hides, our guide on sewing leather with a home sewing machine covers all the prep steps you need before adjusting tension, including choosing the right needle and thread for your material.
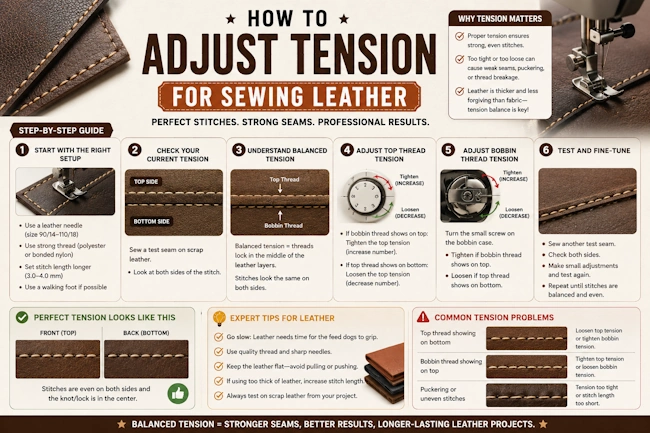
How to Adjust Tension for Sewing Leather: Step-by-Step Guide
Follow these simple steps to dial in perfect tension for any leather project, every time. Always test on scrap leather that matches your project exactly (same thickness, type, and number of layers) before sewing your final piece.
Step 1: Prep Your Machine for Leather
Start by swapping your universal needle for a leather-specific needle (size 110/18 or 120/20, with a sharp wedge tip to pierce leather instead of pushing it aside). Use heavy-duty nylon or polyester thread (not cotton, which breaks easily on leather) and attach a walking foot or roller foot if your machine supports it. Increase your presser foot pressure to the highest setting (this helps feed thick leather evenly, reducing the need for extreme tension adjustments).
Step 2: Set a Baseline Tension
Most machines default to upper tension 4 on a 1-5 dial. For leather, start at 3 (or 4 on a 1-10 dial) as your baseline. Leather’s density means the tension discs don’t need to grip as hard to pull thread through, so you’ll almost always lower tension from the default setting, never raise it.
Step 3: Sew a Test Stitch on Scrap Leather
Sew a 6-inch straight stitch on your scrap leather, using the same number of layers as your final project (for example, if you’re sewing a wallet with two layers of leather, test on two layers). Keep your stitch length at 3-4mm (longer than you’d use for cotton, to avoid perforating leather too much).
Step 4: Check Stitch Quality
Turn your test scrap over and examine both sides. A balanced stitch will have no visible loops on the top or bottom, no puckering around the stitch line, and even stitch length. The top and bottom threads should meet exactly in the middle of the leather layers. If you see loops on the bottom of the leather, your upper tension is too loose. If you see loops on the top, upper tension is too tight. If the leather puckers between stitches, upper tension is too tight.
Step 5: Adjust Incrementally
Never adjust tension by more than 0.5 increments at a time (for example, go from 3 to 2.5, not 3 to 1). Sew a new test stitch after every adjustment, and keep track of your settings so you can revert if needed. Most leather projects will end up with upper tension between 1.5 and 3 on a standard 1-5 dial.
Step 6: Adjust Bobbin Tension Only If Necessary
Only tweak bobbin tension if you’ve adjusted upper tension to the lowest (1) or highest (5) setting and still have unbalanced stitches. Use a small screwdriver to turn the bobbin screw 1/4 turn at a time: turn clockwise to tighten bobbin tension, counterclockwise to loosen. Mark your original bobbin setting with a permanent marker so you can return to it later for other fabrics.
Common Tension Issues When Sewing Leather (and Fixes)
Skipped Stitches
Skipped stitches are almost always caused by a dull needle or upper tension that is too tight. Replace your leather needle (they dull quickly on thick hides) and lower your upper tension by 0.5 increments. If skipping persists, check that your presser foot pressure is high enough to hold the leather flat against the feed dogs.
Puckered Seams
Puckering means your upper tension is too tight, pulling the leather fibers together between stitches. Lower your upper tension by 0.5-1 increment, and make sure you’re using a walking foot to feed both layers of leather evenly. Puckering is permanent on leather, so always test until it’s eliminated.
Loops on the Back of Leather
Loops on the wrong side of your leather mean upper tension is too loose, so the bobbin thread is pulling more than the top thread. Tighten your upper tension by 0.5 increments until loops disappear. If loops remain after upper tension is at 5, loosen your bobbin tension slightly.
Broken Thread or Needles
Broken thread or needles are usually caused by upper tension that is too tight, or using the wrong needle/thread. Lower your upper tension, swap to a heavier thread (or larger needle if your thread is too thick for your current needle). Never force thick leather through a machine that isn’t rated for heavy materials, as this will damage your machine.
Pro Tips for Perfect Leather Tension Every Time
- Test tension every time you switch leather types: chrome tan leather is softer than veg tan, and thin garment leather needs higher tension than thick upholstery leather.
- Adjust presser foot pressure before tension: higher pressure for thick leather reduces the need to lower tension as much, preventing loose stitches.
- Use nylon or polyester thread exclusively for leather: cotton thread breaks easily under leather tension, leading to constant re-threading.
- Keep a tension log: write down the settings that work for each type of leather you use, so you don’t have to re-test every time you start a new project.
Frequently Asked Questions
Can I use the same tension for leather as I do for denim?
No. Denim is a woven fabric with more give than leather, and standard denim tension (usually 4-5) is far too tight for leather. You’ll almost always need to lower tension for leather compared to denim, even if both are heavy-weight materials.
Why does my thread keep breaking when sewing leather?
Thread breakage is most often caused by upper tension that is too tight, a dull needle, or using cotton thread. Lower your upper tension by 1 increment, replace your needle, and switch to heavy-duty nylon thread. If breakage persists, check that your thread isn’t getting caught on a rough edge of your bobbin case.
Do I need a special machine to adjust tension for leather?
No. Most standard heavy-duty sewing machines can sew thin to medium leather (up to 6oz) with proper tension adjustments. You only need a industrial leather machine for very thick hides (8oz+) or high-volume projects. Always check your machine’s manual for maximum leather thickness before starting.
How do I know if my bobbin tension is too tight for leather?
Tight bobbin tension will cause loops on the top of your leather, even when upper tension is set to 5. It can also make it difficult to pull thread from the bobbin by hand. Loosen the bobbin screw 1/4 turn at a time until stitches balance.
Conclusion
Adjusting tension for sewing leather takes a little practice, but it’s a skill that will transform your leather projects from amateur to professional. Always start with a lower baseline tension than you’d use for woven fabrics, test on scrap leather every time, and adjust in small increments to avoid ruining your material. Remember that leather is unforgiving, so taking 5 minutes to test tension will save you hours of frustration (and expensive leather) in the long run. With the right settings, you’ll be sewing durable, beautiful leather goods in no time.