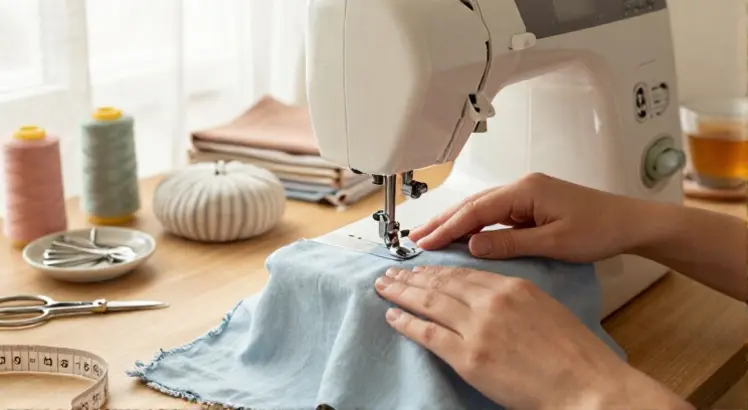
If you’ve ever struggled to create a neat, narrow hem on lightweight fabrics like chiffon, silk, or linen, learning how to use a rolled hem foot will completely transform your sewing projects. This small, specialized presser foot is a game-changer for finishing edges on delicate garments, scarves, and home decor items, replacing tedious hand-rolling and pinning with a fast, consistent machine stitch.
In my 8 years of sewing professional womenswear and home decor, the rolled hem foot is one of the tools I reach for most often. It creates a clean, professional finish that’s nearly impossible to replicate by hand, even for experienced sewers. Unlike bulky traditional hems, a rolled hem lies flat and doesn’t add extra weight to lightweight fabrics, making it ideal for flowy skirts, silk blouses, and chiffon scarves.
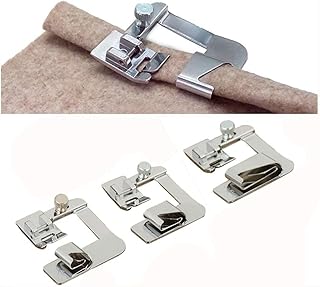
Windman 3 Sizes Wide Rolled Hem Pressure Foot Sewing Machine Presser Foot Hemmer Foot Set 1/2 Inch, 3/4 Inch, 1 Inch Low Shank Sewing Machine Presser Foot for Brother Singer
Check PriceWhat Is a Rolled Hem Foot?
A rolled hem foot is a small, metal presser foot with a curved scroll on the underside that rolls the raw edge of your fabric under before the needle stitches it in place. It creates a narrow, rolled hem (usually 2mm to 6mm wide) that’s far neater than a standard folded hem, with no visible raw edges.
How Does a Rolled Hem Foot Work?
The curved scroll on the foot catches the raw edge of your fabric as you sew, folding it under twice in one smooth motion. The needle then stitches through the folded edge, securing the roll in place. This eliminates the need to pre-fold and pin your hem before sewing, saving hours of prep time for large projects like curtains or scarves.
If you’re completely new to this tool, you can first read our breakdown of what a rolled hem foot is designed to do to understand its basic function before learning to use it.
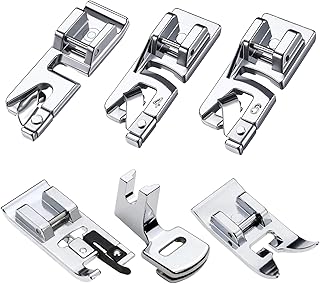
6PCS Sewing Machine Presser Foot Kit, Rolled Hem Presser Foot 3mm/4mm/6mm, Gathering Foot, Zigzag Foot & Overlock Foot, Low Shank Snap On Sewing Feet for Most Domestic Machines
Check PriceTools You’ll Need Before You Start
- A sewing machine compatible with snap-on or screw-on presser feet
- A rolled hem foot in the size you need (2mm, 4mm, or 6mm are standard; 4mm is best for beginners)
- Lightweight to medium-weight fabric (avoid thick fabrics like denim or canvas for your first try)
- All-purpose polyester thread (match the color to your fabric)
- A fresh size 70/10 or 80/12 universal needle (finer needles work best for delicate fabrics)
- Iron and ironing board
Rolled hem feet come in different shank types (low, high, slant) to fit different machines. Check out our guide to the best rolled hem feet for all major sewing machine brands to find the right fit for your setup.
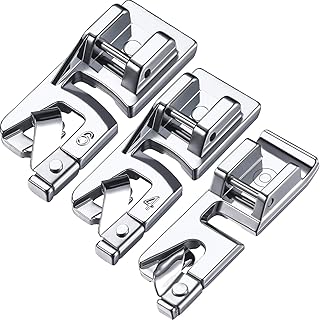
Boao 3 Pcs Narrow Rolled Hem Sewing Machine Presser Foot Set Includes 3mm, 4mm and 6mm Suitable for Household Multi-Function Sewing Machines Accessories
Check PriceStep-by-Step Guide: How to Use a Rolled Hem Foot
Step 1: Prepare Your Fabric and Machine
Prewash and iron your fabric to remove any wrinkles or sizing that could affect the hem. Set your sewing machine to a straight stitch with a stitch length of 2.0 to 3.0mm (shorter stitches work better for delicate fabrics, longer for medium weight). Insert a fresh fine needle, and wind your bobbin with matching thread.
Turn off your machine, then remove your standard presser foot. Attach the rolled hem foot: for snap-on feet, push the release lever and click the new foot into place; for screw-on feet, loosen the screw, position the foot, and tighten it securely. For more details on presser foot compatibility, refer to this expert guide to rolled hem feet, a leading authority on sewing techniques.
Step 2: Create a Starter Fold (Critical for Success)
The most common mistake beginners make is trying to start sewing with the rolled hem foot immediately. The foot needs a pre-folded starter edge to grip onto, or the fabric will slip and the hem will be uneven. Follow these steps to create a starter fold:
- Fold the raw edge of your fabric 1/4 inch to the wrong side, and press with an iron.
- Fold the edge 1/4 inch again to the wrong side, enclosing the raw edge completely, and press again.
- Switch back to your standard presser foot, and stitch this folded edge down for 1 to 2 inches. Backstitch at the start and end to secure it.
This starter fold gives the rolled hem foot something to grip when you start sewing.
Step 3: Position the Fabric and Start Sewing
Switch back to the rolled hem foot. Slide the starter folded edge into the curved scroll on the underside of the foot, making sure the fold sits snugly in the scroll. Lower the presser foot, and pull the top and bobbin threads to the back of the fabric.
Hand-walk the machine (turn the handwheel toward you) for the first 2 to 3 stitches to make sure the fabric is feeding correctly. Once the stitches are even, press the foot pedal gently and sew at a slow, consistent speed. Do not push or pull the fabric: the foot and feed dogs will pull the fabric through on their own. Guide the fabric gently with your hands to keep it straight.
Step 4: Handle Corners and Curves
For gentle curves, slow down slightly and guide the fabric to follow the curve. The rolled hem foot will adjust to the curve automatically. For sharp corners, stop sewing with the needle down in the fabric, lift the presser foot, pivot the fabric to the new direction, lower the foot, and continue sewing.
Step 5: Finish the Hem
When you reach the end of your hem, backstitch for 2 to 3 stitches to secure the thread. Lift the presser foot, pull the fabric away, and trim the threads close to the fabric. Press the finished hem with a cool iron to set the stitches and remove any wrinkles.
Common Mistakes to Avoid When Using a Rolled Hem Foot
- Skipping the starter fold: This is the #1 cause of uneven, messy rolled hems. Always create a pre-folded starter edge.
- Using thick fabrics: Rolled hem feet are designed for lightweight to medium-weight fabrics. Thick fabrics like denim or wool will jam the foot’s scroll.
- Sewing too fast: The foot needs time to roll the fabric edge. Sewing at high speed will cause skipped stitches or puckering.
- Using a dull needle: Dull needles will snag delicate fabrics like silk or chiffon. Always use a fresh needle for each project.
- Not adjusting tension: If your hem is puckering, reduce your upper thread tension slightly. Test on scrap fabric first.
Tips for Using a Rolled Hem Foot on Delicate Fabrics
Delicate fabrics like chiffon, silk, and lace are the most common uses for a rolled hem foot, but they can be tricky to work with. Follow these tips for best results:
- Use a size 70/10 sharp needle instead of a universal needle to prevent snagging.
- Use silk thread instead of all-purpose polyester thread for a softer, less visible finish.
- Reduce your stitch length to 1.8mm for very lightweight fabrics to prevent puckering.
- Place a piece of tissue paper under the fabric as you sew, then tear it away after. This prevents the feed dogs from pulling the delicate fabric out of shape.
Rolled Hem Foot vs. Bias Tape: Which Should You Use?
Many beginners wonder if they should use a rolled hem foot or bias tape to finish edges. Bias tape wraps raw edges with a strip of fabric cut on the bias, while a rolled hem foot creates a self-finished hem using only the project fabric. Use a rolled hem foot for narrow, invisible finishes on lightweight fabrics; use bias tape for thick fabrics or when you want a contrasting edge color.
Frequently Asked Questions
Can I use a rolled hem foot on thick fabrics like denim?
No, rolled hem feet are designed for lightweight to medium-weight fabrics only. Thick fabrics like denim, canvas, or wool will not fit into the curved scroll of the foot, and will jam the machine or break the needle. Use a standard folded hem or bias tape for thick fabrics.
Do I need a special needle for a rolled hem foot?
You don’t need a special needle, but you should use a fine needle (size 70/10 or 80/12) for best results. Universal needles work for medium-weight fabrics, but sharp needles are better for delicate fabrics like silk or chiffon to prevent snagging.
Why is my rolled hem puckering?
Puckering is usually caused by incorrect tension or sewing too fast. Reduce your upper thread tension slightly, and sew at a slower speed. If the puckering persists, try using a stabilizer like tissue paper under the fabric as you sew.
How do I know what size rolled hem foot to buy?
2mm rolled hem feet create very narrow hems for delicate fabrics like chiffon. 4mm is the most versatile size, ideal for most lightweight to medium-weight fabrics. 6mm creates wider hems for medium-weight fabrics like linen or cotton. Beginners should start with a 4mm foot.
Conclusion
Learning how to use a rolled hem foot takes a little practice, but it’s a skill that will elevate all your sewing projects. Start by practicing on scrap fabric of the same weight as your project, and don’t get discouraged if your first few hems are uneven. Most sewers master the technique after 3 to 4 practice runs.
Remember to always create a starter fold, sew slowly, and use the right needle and thread for your fabric. Once you get the hang of it, you’ll be able to create professional-quality rolled hems in a fraction of the time it takes to hand-sew them. Grab your rolled hem foot, pick a lightweight fabric, and give it a try today!